How to Easily Shoot Night Street Photography Images
Introduction
ISO 1600 - 6400. Aperture f /2.8 - f /1/4. Shutter Speed 1/80 sec - 1/200 sec. Put simply, this is a great starting point for the settings on your camera for easily getting to grips with night street photography.
However, there are a lot more technical factors to consider. Want to learn more?
Let's get into it.
Camera
I would certainly advise using a camera rather than a phone to take photos at night. Cameras, these days, especially DSLRs and mirrorless cameras are very capable of shooting in the dark. You can get fairly noise-free images up to ISO 6400. Of course, when it comes to street photography, grain in your images comes with the territory. Even advanced point and shoot cameras with fairly fast aperture lenses make good night street photography cameras in the current climate.
Lens
If you are using an interchangeable lens system then ideally you want a fast aperture lens of at least f /2.8. The reason for this is that wider apertures let more light in through the lens to the camera’s sensor.
Also, it is much easier to hand hold the camera with wide angle prime lenses, such as 50mm, 35mm, 28mm, than it is with telephoto lenses. This is because of the reciprocal rule for shutter speed, which states that your shutter speed ought not to be slower than the reciprocal of your focal length in order to avoid camera shake. Therefore, if you are using a focal length of 50mm, then the slowest shutter speed that you should use is 1/50th sec. If you use a 100mm lens then the slower shutter speed that you need to be using is 1/100 sec. The longer the lens, the more movement will be exaggerated because of the size, compared to wide angle lenses. Of course, there are a couple of other factors that determine the slowest shutter speed that you can use. How good are you at holding the camera steady without getting blurry shots? Does your camera or lens have image stabilisation? So, don't just follow the reciprocal rule, check those two possibilities to find out the slowest shutter speed that you're able to handhold your camera at.
Metering Mode
For the simplest metering use Evaluative / Multi-Segment Metering Mode. This mode works by taking a reading across the entire frame. I use this mode for night street photography because there might be various artificial lights in the composition which also includes people and therefore I want the camera to analyse light across the frame.
However, if there is a subject in the centre of the frame and they are illuminated by a shop window and are surrounded by shadows you can try using Centre Weighted Metering Mode. Centre-Weighted Metering Mode takes a reading from only the centre portion of the frame, ignoring the corners and the areas around the centre portion.

Aperture
As part of your settings for nighttime street photography, you're definitely going to need to use a wide aperture so that you can expose properly for dark conditions. Depending upon what aperture you use the diaphragm of the lens opens wider when you are using wide apertures and the diaphragm closes down when you are using narrow apertures. So it stands to reason that the wider the diaphragm, the more light gets through the lens and onto the camera’s sensor.
If you are concerned about having a shallow depth of field because you are using wide apertures at night, you will find that how shallow your depth of field is, also depends on how far the lens is from your subject. Even with a wide aperture, if you are fairly far away from your subject, the greater the depth of field there will be. The closer the lens is to your subject, the shallower the depth of field there will be.
Short focal lengths, typically used for street photography, provide a greater depth of field, than longer focal length lenses. If you are using a 28mm lens and you are shooting at f /2.8 and your subject is 2 metres away your depth of field near limit will be 1.65 metres and the far limit will be 2.54 metres and your actual depth of field will be 0.89 metres. However, if you're using a 100mm lens and you are shooting at f /2.8 with your subject 2 metres away, your depth of field near limit will be 1.97 metres, the far limit will be 2.03 metres and the actual depth of field will be only 0.06 metres.
Shutter Speed
Freezing your subject at night will require a slower shutter speed than you would use during the daytime. A slower shutter speed means that the shutter covering the camera’s sensor is open for longer than it would be for a fast shutter speed. As you can imagine, the longer the shutter is open the more time light is reaching the camera’s sensor. This results in a brighter exposure which is great for night street photography.
Therefore, depending upon what lens you are using, how dark the area you are in is, and how well you can hold the camera without getting blurry shots (does your cameras or lens have IBIS?), a shutter speed of approximately 1/50 - 1/200 sec is in the ballpark of what you need for night time street photography.
However, if you are looking to photograph blurry subjects then keep on slowing down your shutter speed until you get the desired effect.
ISO (Auto ISO)
Unless you are using a tripod and you are simply shooting urban landscapes, where you can afford to use very slow shutter speeds and low ISOs, you're going to need to use high ISOs when your hand holding the camera for nighttime street photography. Typically the ISO for night street photography should be approximately 1600 - 6400, depending upon the ambient light conditions that you find yourself in.
However, there is another way. If you use Auto ISO, then you don't have to worry about changing the ISO as the camera will do it for you. All you need to do is set an ISO range in the Auto ISO function on your camera (1600 - 6400).
Whilst doing this you will also be able to set a minimum shutter speed, so pick one that you know works for you at night, such as 1/80 sec.
If you are using Aperture Priority, then you will be able to change the aperture and let the camera choose the other variables. If you enter an area that requires a slower shutter speed than your minimum of 1/80 sec, then the camera will start to increase the ISO from its base level of 1600. If unfortunately, the exposure is still too dark at ISO 6400 (the top of the range) at the minimum shutter speed of 1/80 sec, then your camera will sacrifice the minimum shutter speed that you set and go slower.
If you are using Manual Mode, depending upon the camera brand, you can still choose a minimum shutter speed. However, you will be able to change the shutter speed along with the aperture. The difference between using Auto ISO in Manual Mode, compared to Aperture Priority for most camera brands, is that the camera will vary the ISO as you work, as opposed to waiting until the exposure hit the minimum shutter speed before increasing the ISO.
Also, in Manual Mode, if you have chosen the widest aperture that your lens allows and the camera is at the minimum shutter speed and at the base ISO that you set, instead of slowing down the shutter speed, it will overexpose the photograph. So Auto ISO in Manual Mode does it work differently from Auto ISO in Aperture Priority.
Camera Mode
I personally use Manual Mode as I like to have full control of each setting for my night sessions, apart from letting the camera choose the ISO with Auto ISO.
However, if you are fairly new to night street photography or just street photography in general then Aperture Priority will work great. You will also be able to use Exposure Compensation to fine-tune your exposure. This is always needed when the highlights from street lamps and shop lights become clipped as they invariably always do.

Focusing
On my Ricoh GRIII, I don't want to rely on Continuous Autofocus at night, so I either use Auto-area AF, which works well 90% of the time, unless it's extremely dark. Alternatively, I might use Snap Focus. This is basically Zone Focusing. To Zone Focus you need to manually pre-focus your lens to a certain distance. The best place to do this is at home, by placing objects at certain distances away from your camera and lens and focusing on those objects. Zone Focusing works better at narrow apertures because there is a greater depth of field as opposed to wide apertures, but with practice, it is still possible to zone focus at night with wide apertures.
However, Continuous Autofocus for moving subjects or Single Shot Autofocus for still subjects (or moving subjects dependent upon how good your camera's autofocus system is), is the easiest technique for focusing at night. Check your camera's manual and test out its autofocus capabilities for the best results. For instance, I mostly use Single Shot Autofocus with the Wide Area setting on my Sony A7RIII, as I found this to be extremely reliable even with moving subjects.
Night Lights
The most important aspect of night street photography is the light. Thankfully if you are living in a city or in a town there should be an abundance of artificial light coming from lamps and shops and even car lights to light your scenes. Basically, without these lights, there is nothing to light your images.
The glows from these lights bring out detail, create texture and illuminate the subjects, that you are shooting. Shop lights can also be coloured, as are car lights. This means your night street photos can look really atmospheric and naturally colourful.
As I said before, you will need to ensure that you expose correctly for all the lights, using Exposure Compensation to underexpose the image; or if you are shooting in Manual Mode and Exposure Compensation is not available to use, either adjust your aperture, your shutter speed or your ISO (if you are not using Auto ISO), to underexpose.

Composition Ideas
Leading Lines
Straight or curved streets make natural leading lines that you can utilise in your compositions. Shoot from a low perspective to emphasise the road’s natural leading line.
Reflections
Puddles from the rain always can be used as reflections in your images, if you shoot low from the ground incorporating them into your images. Also, stand next to windows and you will see reflections of the street around you in many cases.
Windows
Photograph steamed up and even dirty windows, with people standing, or dining inside for some atmospheric shots.
Subject and Object Placement
Use the rule of thirds by your subject on one of the cross-sections of the thirds for a pleasing composition. You can even break this by placing a street lamp or anything similar in the centre of your image or by the very edge of the frame. It is up to you to determine what looks good, what subjects or objects are balanced in your image, or not.
Colour
Use colours from lamps, shop lights and anything that they illuminate, to add vibrancy to your photos and also use complementary colours for a specific vibe or theme in your photography projects.
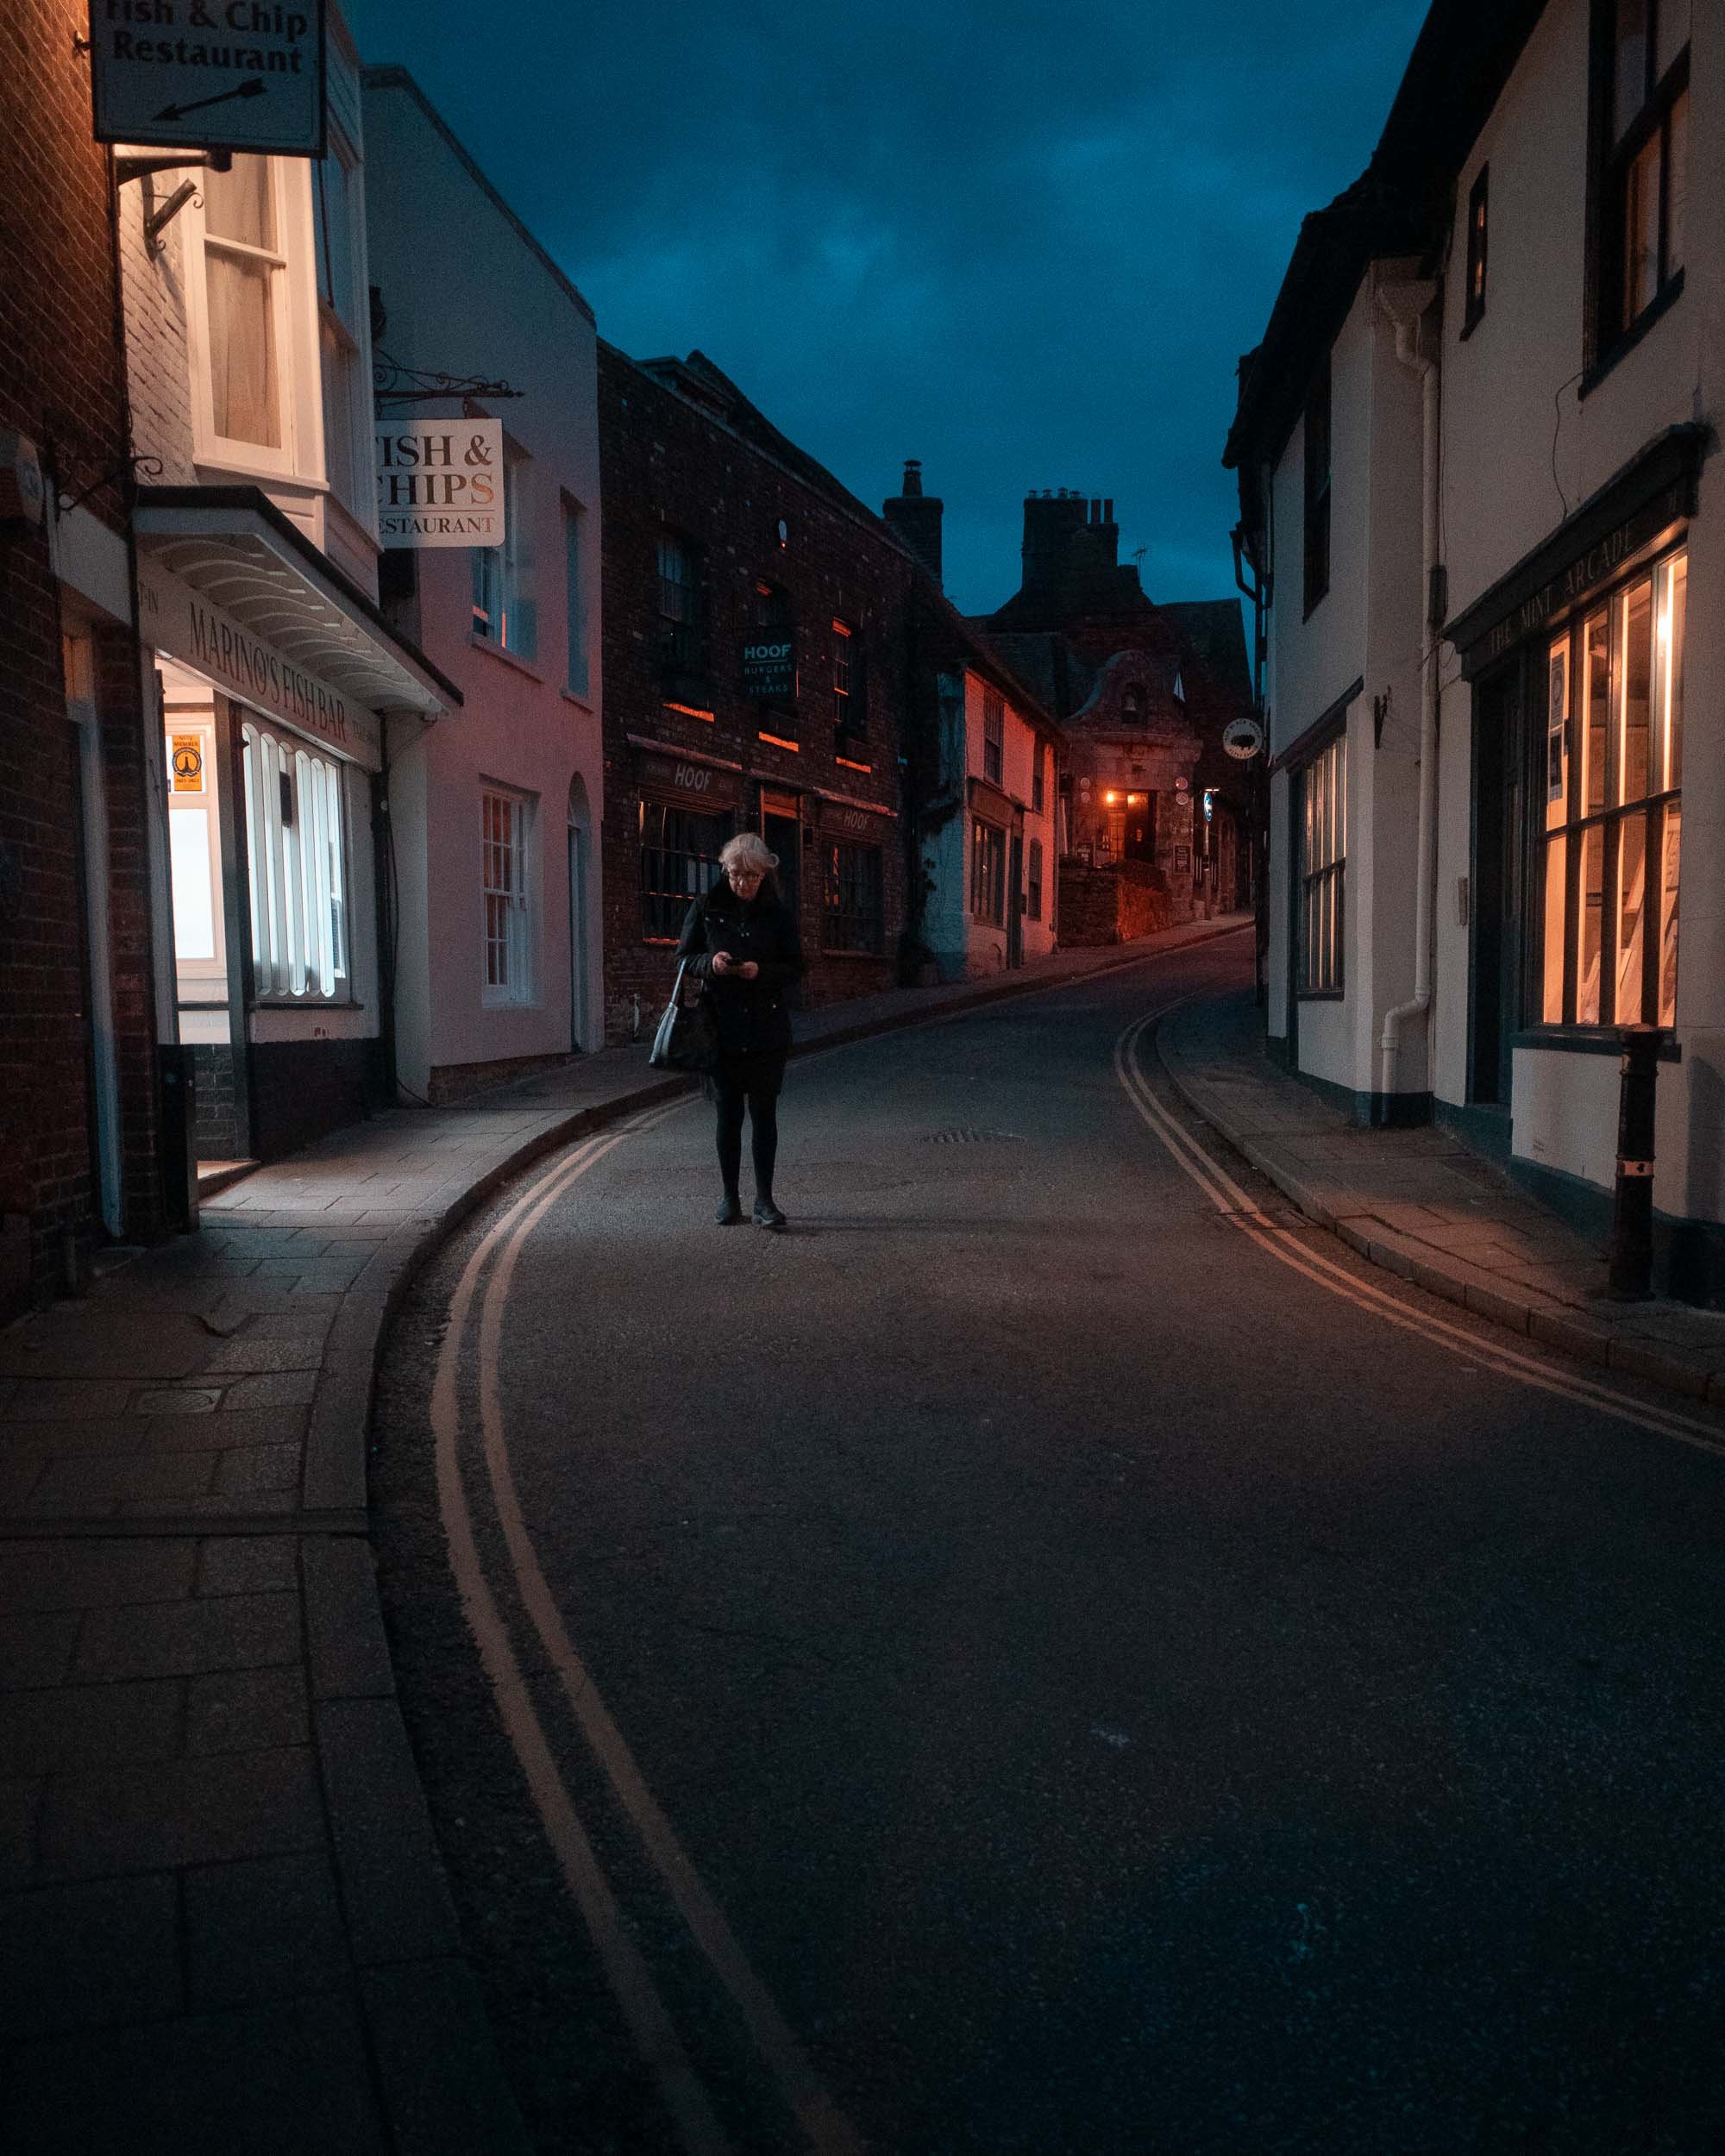
Settings for This Image

This image was shot with the Ricoh GRIII, a point and shoot, fixed lens camera with a fairly fast aperture of f /2.8.
For this image, I wanted to meter for the entire scene across the frame, so I used Multi-segment metering
Because I like full control of my camera, especially at night, I chose to shoot in Manual Mode which allows me to control each setting individually, to my taste.
The ISO I shot at was 6400. However, I used Auto ISO which meant that I can set a range that I want my ISO to fall within, such as 1600 - 6400. This means that I do not have to worry about changing the ISO. I can let the camera choose the specific ISO needed depending upon the exposure. It was very dark in this area, apart from the lighting from the shops and takeaway, therefore the camera chose ISO 6400.
I needed as much light as possible in order to expose correctly, therefore I picked the fastest aperture of f /2.8 which allows as much light as the lens can let in, onto the sensor.
Auto ISO allows you to pick a minimum shutter speed. It was so dark that the minimum shutter speed of 1/80 sec was reached.
For this image I used Autofocus. Auto-area AF on the Ricoh GRIII, simply because I know it works well at night. Other camera brands and models have their own autofocus capabilities so check your camera to see how well it works at night.
I noticed that the curvature of the road made an interesting leading line. The ambient lights from the shops on both sides of the road and in the distance, gave me sufficient light to illuminate the subject.
Conclusion
I hope that these tips give you an idea of how easy it is to shoot night street photography. Don't wait around, go out and start practising tonight.
Go forth and create.