How to Zone Focus With Your Camera - A Street Photographers Guide

Zone Focusing is great for street photographers. Using one of three simple methods you are manually pre-focusing your camera and lens and adjusting your aperture, for a specific distance where everything will be in focus and will have a deep depth of field, within that area (zone) that you have set the focus for.
Zone focusing takes away the focusing when you hit the streets for a shooting session.
But what is actually is zone focusing and how does it work?
Let's get into it.
Focusing and Street Photography
There are a number of methods that street photographers use to focus. Burst Mode Autofocus, relies on the camera's autofocus system, where the camera focuses on a subject and locks. You press the shutter button and it fires several sequential shots. I personally use this with Wide focus so that the focus picks up the entire frame. I find that my keeper rate is 95%. The only issue with Wide is that it will generally focus on what it is the area in front of the frame. Say like I wanted to shoot through some leaves that are framing the scene, at a couple in the distance. The leaves would most likely be in focus and the couple may be blurred if I didn't refocus on them.
Continuous autofocus is one of the most popular street photography focusing methods. The camera detects the subject's movement and the focus points lock on to the subject as they move. As of 2021, most camera brands autofocus systems works brilliantly, however certain lenses don't work with autofocus as well as others. You really need continuous autofocus to be accurate and fast to always get those great street snaps.
Manual focus
This is where zone focusing starts to make the street photographer's shooting a whole lot easier. Once you have set your camera to Manual Focus, you can then use one of the following methods to ensure that all of your shots within a certain distance (of your choosing) will be sharp, in focus and have a deep depth of field.
Why Zone Focus?
Probably the most important aspect of Street Photography is capturing that decisive moment, quickly and effectively. Zone focusing completely takes away the 'focusing' element of street photography. Because you have pre-focused the lens for a specific range of feet/metres to a zone (an area) where everything will be sharp within that distance, all you have to do is to fire the shutter button when you see that moment that you need to capture.
You do not need to wait for the green box to fix itself upon the subject. You do not have to quickly turn the focus ring to get your subjects in focus. All the focusing is done before you take photos making your shooting session more streamlined, allowing you to be in the moment.
Another excellent element of Zone Focusing - You no longer have to watch the focus point lock on to a subject. You can take photos without holding the viewfinder to your eye, making your street shooting more stealth-like. You will less likely be drawing attention to yourself and the people you are photographing.
One more point - Whatever zone that any of the methods listed below give you (i.e. you want to focus three metres away at an aperture of f /8) if your zone of sharpness (more on this later) is under 2 metres to 8 metres, then if your subject moves further away or nearer than both limits of your zone, all you have to do is move so that you are further back or move forward to stay in the 2 - 8 metre zone.

Depth of Field and Aperture
A narrow aperture will generally ensure a deep depth of field. The more you stop down, (the narrower your aperture gets) the more depth of field you will have in your composition. This is one reason why Zone Focusing is best used with apertures of f /8 - f /16.
If depth of field refers to the zone of acceptable sharpness, then everything within that 'zone' will be sharp. Focusing on a person who is five feet away would make not only that person sharp and in focus but also an amount of area in front and behind that person. This is the 'zone of acceptable sharpness'.
Generally, street photography is shot at a close distance, however, the closer you are to your subject, the shallower the depth of field will be, and in contrast the further away you are the deeper the depth of field will be. This is why actually setting the focus, with zone focusing, is so important.
Finally, the lens that you choose for zone focusing is extremely important. Wide lenses (up to approximately 50mm) have a deeper depth of field, than longer lenses. This is why shooting at 28mm, 35mm and 50mm is preferable.
How to Zone Focus by Learning & Experience
If you haven't got any markings on your manual lens or if you just want to try out zone focusing then this method is for you.
First, make sure that you are using a wide-angle lens, prime is best and nothing greater than 50mm.
Set your camera to Manual Mode and choose a medium to narrow aperture. Anything from f/8 - f/16.
Choose a Shutter Speed that will allow you to capture movement. I always go for 1/250 sec or faster.
Adjust to your ISO to get a decent Exposure or use Auto ISO in Aperture Priority or Manual Mode.
Next, you will need to pre-focus your lens. Where would you like to focus? Personally, I don't get too close to my subjects, so approximately the 5-metre mark would work for me. However, it really depends upon your style. Choose 2 or 3 metres if you like to get into people's faces or you enjoy shooting street portraits.
To pre-focus your lens -if you do not have a scale on your lens or in your camera menu, the simplest way is to practice. Learn distances before you go out shooting, by placing objects, friends or family members at different distances, using a tape measure and focus on each in turn. Then before your big day of shooting, you can pre-focus on a subject and measure its distance and then leave your lens at that focus distance when you leave your abode.
The more that you practice, the simpler pre-focusing at a specific distance, will become. Before long it will be like second nature to choose your comfort zone of zone focusing.

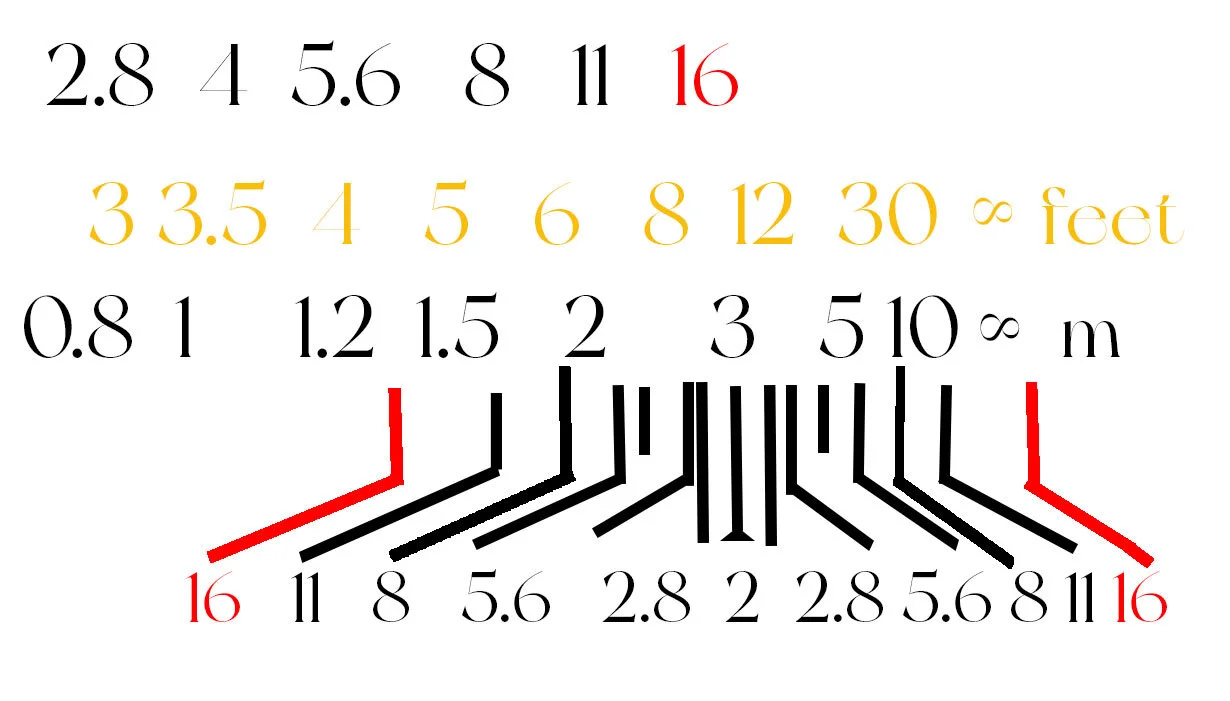
Zone Focusing Manual Lens DOF Scale
Check out this Leica Summilux-M 35mm f/1.4 ASPH. Lens from B&H
On many manual focus lenses, you have three printed areas on the rings.
The top printing is the aperture ring which you can manually turn to select the desired f-stop.
The next area is the focus ring which moves from the lens closest focusing area to the infinity symbol.
Finally, at the bottom, you have the zone focusing area with lines that delineate the zone that will be in focus. This is specifically created and used for zone focusing.

Image Credit: B&H Photo Video
Note: The diagrams are representative of a manual lens. Markings may differ, depending upon the lenses fastest aperture and brand.
The aperture of f /2 is extremely wide and shallow that if you were to select this f-stop, and you wanted to focus on an area that was 3 metres away, the line on the zone focusing ring (that I have coloured red) is the only point that would be in focus - The zone of focus at f /2 is so minimal that you literally have that specific area at approximately 3 metres in focus.

Yet, if I chose a narrow aperture of f /8 at the same distance away (3 metres), you can see that everything from just under 2 metres approximately 8 - 9 metres, will be in focus, as noted by the red lines. This gives you a much greater zone of depth of field.

Imagine that you are shooting at f /8 and your subject is 3 metres away and they are walking past the Eifel Tower, which is 15 metres away. You want both subjects to be in focus, but the Eifel Tower is not within your zone of focus. To fix this all you need to do is to increase the distance on the focusing ring by turning it so that the 3 and the infinity sign are within the f /8 markers. Now, everything from 3 metres to infinity will be in focus.

At f /16, if you focus at 3 metres, because that is a very narrow aperture, everything from approximately 1.3 metres to infinity will be in focus, according to the scale.
Once you have used the scale on your manual lens a few times and have learned how the markings and the equivalent distances and apertures work then this becomes a very simple method to use.
Some cameras have a distance scale built into the camera itself (on the LCD/Viewfinder) that works when you turn the focusing ring on the lens. The Sony A7RIII has a scale indicator that moves in metres when you turn the ring. However, the accuracy of the scale is not 100%.
Fuji also has a Manual Focus Indicator
Ricoh GR Models are pretty much made for zone focusing. You can choose your set distances with Snap Focus and Manual Focus Modes.
Zone Focusing DOF Calculator
The final method represents a quick calculation to find the focus distance at a specific focal length and Aperture of your choice.
On this simple to use Cambridge in Colour Depth of Field Calculator, I start by selecting the Camera Type (Full Frame).
Then I select the aperture that I want to shoot in.
I pick the focal length of my lens.
I type in the zone focusing distance that I want to focus at. (Also displays feet).
Once I click calculate, I am told that my zone of focus will be from 2.45 metres all the way to infinity.

All I need to know is how to focus my lens for 5 metres, which as I said earlier, comes with quick practice.
As you can see by selecting a very wide aperture of f /2, I have greatly reduced my zone of acceptable sharpness. Only 2.78m will be in acceptable focus. However, learning how to work with such a narrow zone range will come in handy for low light street photography.

The Brilliance of Zone Focusing
Zone Focusing, just like Auto ISO, takes away a technical element that would ultimately slow down the shooting process of the Street Photographer.
By pre-focusing, before you shoot and not having to check focus when you take the photos you really can be zoned in, ready to capture that decisive moment, simply by looking through the viewfinder, using the LCD, or even shooting from the hip.
Go forth and create.