How to Use The Exposure Triangle For Street Photography
Introduction
Ever wanted to know how the Exposure Triangle really works?
Once I understood and mastered how the Exposure Triangle worked, not only for Street Photography but for all genres of photography, I was able to make informed and creative choices when I took photos. I found that good exposure leads to less time trying to fix images in post-processing and more time out shooting and improving.
Let's get into it.
What is exposure?
Put simply, exposure is the amount of light that hits the camera sensor, resulting in the general brightness and darkness of the image.
Why is exposure important?
As I said in the intro, properly exposed photos are much easier to work with and therefore take up less time editing. Underexposed images generally need careful consideration, due to noise in your images. On the flip side, overexposed images can be ruined from the get-go if clipping of the highlights occurs.
Sometimes when shooting Street photography you need to underexpose your images, particularly when you are shooting into the sun, or a brightly lit area. However, the downside of underexposing is having noise in the shadow areas of an underexposed image. Even with modern, top of the range cameras, when shooting at ISO 100, you can still get noise in the shadows when underexposing. Also, noisy shadow areas lose detail and are very difficult to sharpen cleanly. This is why, for the majority of cases, it is best to expose correctly.
Overexposure can result in clipped highlights, which in the majority of situations leads to an unfixable whitish area where the sky or lights are, that no amount of White or Highlight slider reduction will fix.

Stops
Exposure is measured in stops. A stop doubles or halves the light that makes up the exposure of an image.
What this actually means is that every time you decrease or increase the Shutter Speed, open up or narrow down the Aperture, or increase or decrease the ISO, by a single amount, you are effectively doubling the exposure or halving the exposure.
For example, if you increase the Shutter Speed from 1/125th sec to 1/1250 sec, you are subtracting a stop of light, and halving the exposure. (A faster Shutter Speed is always darker because the shutter is open for less time)
If you change the Aperture from f /11 to f /5.6 you are adding two stops of light (f /11 -f / 8 is one stop - f /8 - f /5.6 is one stop). The lower the number gets, the more you are opening the Aperture, making the diaphragm of the lens wider, thus letting more light in, through the lens and onto the camera's sensor.
If you increase the ISO from 100 - 800, you are increasing the exposure by three stops of light. When you increase the ISO you are making the camera's sensor more sensitive to light (brightening the image).

ISO
ISO is the sensitivity of your digital sensor. The higher the ISO, the less light is needed to make a correct exposure because you are increasing the brightness at higher ISOs. On the other hand, a low ISO means that your sensor needs more light to make a correct exposure. The higher the ISO, the more noise there will be in your images. However, as a Street Photographer, I don't worry too much about noise. That is why at night I am comfortable shooting at high ISOs.

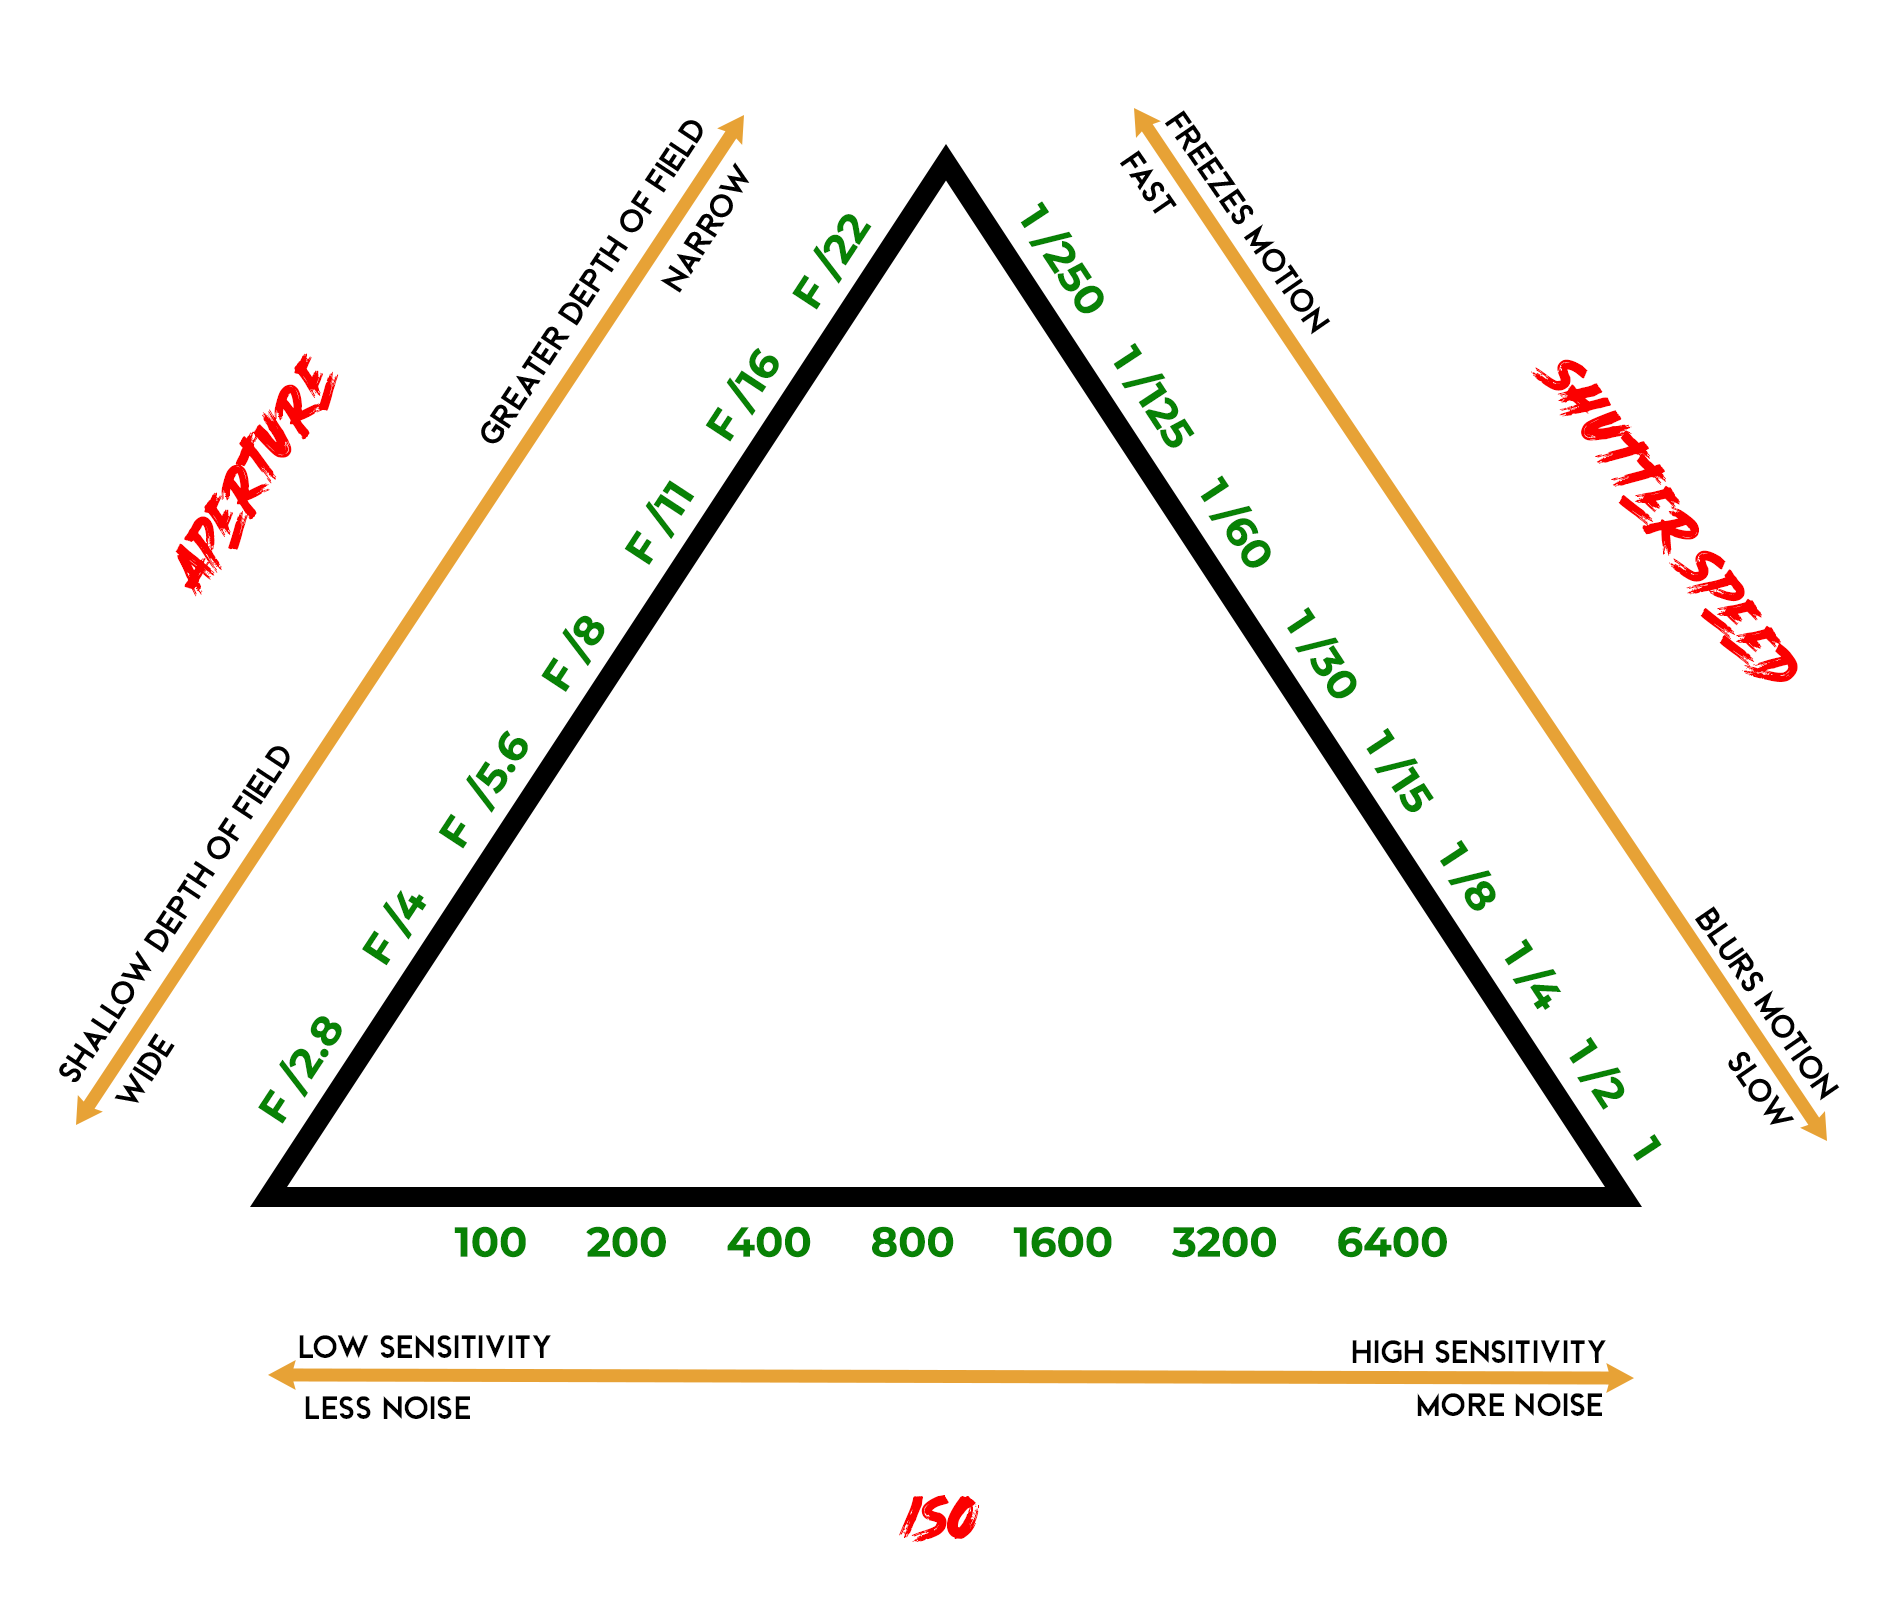
As ISO increases the values are more sensitive to light, however more noise is generated
Shutter Speed
Measured in seconds, Shutter Speed is the amount of time that light hits the sensor. So a Shutter Speed of 1/4000 sec, is exactly that. The shutter is literally open for one four thousandth of a second! The speedier the shutter is open, the faster the action you'll be able to capture. As I said before, this will make the exposure darker. At the other, end a Shutter Speed of 1 second results in the shutter being open for much longer. This allows more time for light to hit the sensor, making the picture brighter but also making the speed blurrier.

As the Shutter Speed gets slower, the image gets blurrier and lighter
Aperture
Camera lenses let light in through the diaphragm of the lens. Obviously, the wider the diaphragm opening the more light gets in through the lens and onto the sensor. Conversely, the narrower the diaphragm opening, the less light gets in.
So when you opt for a narrow Aperture (large numbers) ie f /16, you get a much greater depth of field than if you have your Aperture wide open at f /2.8. At such a wide Aperture, the background of your image will be blurry, depending upon how close you are to your subject. Wide Apertures are typically used for portrait photography when you want nice bokeh, whereas narrow Apertures are great for landscape photography. However, street photographers are known to use both wide and narrow Apertures, depending upon the situation.
Aperture values are measured in a term called f - stops which is the ratio that denotes the opening of the diaphragm.
The reason why you have a much greater depth of field at narrow Apertures and a much shallower depth of field at wide Apertures is extremely technical and denotes an article by itself that is much greater than the scope of this post. However, check out my guide on The Best Aperture To Use For Street Photography

More light gets in through the diaphragm as the aperture gets wider leading to a bokeh background
Light
Even though it is called the Exposure Triangle there is one more variable that every photographer has to work with every single time they take a photo, and that is light! Whether you're shooting in the bright midday sun, or within a neon-lighted cityscape at night, any kind of light will determine what settings you use when taking your shots.
For street photographers exposure settings, at night, to let more light in, you mostly have to increase the ISO, shoot at wide Apertures, and generally shoot with a fastish Shutter Speed, but not too fast.
However, on a sunny day, you can shoot with much narrower Apertures; you can crank up the Shutter Speed and keep the ISO at base level, in many situations.
So the settings that you use for the Exposure Triangle will always be determined by the light conditions that you are shooting in.

The Exposure Triangle
So you may be asking how does the exposure triangle work? Let me use a few simple examples so that we can delve into this deeply.
Example one
I am on one side of the street shooting a well-dressed man coming down the road on the opposite side of the street. It is a dark and cloudy day, so I am shooting at ISO 400, my Aperture is at f /8 and my Shutter Speed is at 1/60 sec. I want to catch this guy in sharp detail and I suddenly realise that even though, with the lighting conditions at this very moment, my exposure is perfect, my Shutter Speed is definitely too slow to capture this guy sharply.
If I decide to decrease the exposure by increasing the Shutter Speed to 1/250 sec, because there are three parts of the exposure triangle, I will also need to also change my Aperture and/or my ISO to get another correct exposure. By changing my Shutter Speed to 1/250 sec, without changing the other variables, I am currently underexposed.
From 1/60 sec to 1/250 sec there are two stops (1/60 1/125 1/250), therefore, I will either need to either decrease my ISO by two stops to ISO 100 (400 200 100), or my Aperture by two stops to f /4 (f /8 f /5.6 f /4). In this instance, I can quite simply reduce my ISO one stop to ISO 200 and the Aperture to f /5.6, in order to get the correct exposure.
Example two
I've just asked somebody on the street if I can photograph their portrait. My street photography exposure settings are currently set to an Aperture of f /16, Shutter Speed 1/1000sec, and an ISO of 800. It has been a very sunny day but it is now getting dark. I definitely want to capture this person with a shallow depth of field because I'm on a street with people carrying boxes in the background and I want to blur them out. Also, I don't know this person so I don't want to ask them to walk to another location. I want to capture them quickly and move along.
I decided to change my Aperture to f /2.8. However, this is a five stop increase from f /16 (f /16 f /11 f /8 f /5.6 f /4 f /2.8) and the image is overexposed. Therefore, I need to either decrease my ISO and/or my Shutter Speed by five stops as well, in order to get a proper exposure. I want to capture this person sharply so I cannot sacrifice my Shutter Speed by making it too slow. On the other hand, I don't want to reduce my ISO too much as it is now very dark.
Therefore, I decide to split the difference by decreasing my Shutter Speed three stops to 1/125 sec (1/1000 1/500 1/250 1/125). I know I can get sharp shots holding the camera at this Shutter Speed.
And I also decrease my ISO by two stops - from 800 to 200, (800 400 200). The lights from the surrounding street lamps and the car lights provide some ambient light to work with and the very bright Aperture helps.
Example three
It is nighttime. I am standing outside a popular takeaway, photographing people ordering their dinners and coming out of the shop. Nobody is moving fast, therefore my Shutter Speed is at 1/125sec, my Aperture is at f/4 and my ISO is 400. I've been shooting with the correct exposure the entire time.
All of a sudden, somebody throws their kebab at a customer's head. A fight breaks out and more and more people join in. I really want to capture this, but I know my Shutter Speed is just too slow. So I increase it to 1/1000 sec. I am now three stops underexposed (1/125 1/250 1/500 1/1000). I need to very quickly and either change my ISO and/or my Aperture.
I don't need any extra depth of field as I am standing on the opposite side of the road and I'm focusing quite far away from my subjects (which is now a good thing!). Therefore, in order to get a correct exposure, I need to quickly increase my ISO by three stops, so I speedily move the dial to ISO 3200 (400 800 1600 3200) and voila, happy snapping!
Conclusion
Even though the Exposure Triangle exists as the underpinning of correct exposure, you as the photographer are able to make creative choices with your Aperture and your Shutter Speed to get the kind of look that you are after in your images. By doing this, it may mean that you underexpose or even overexpose slightly to get that perfect image.
However, the exposure triangle is there to guide you and will give you the fundamental groundwork to create great photography time and time again.
Go forth and create.