Lightroom Night Photography Editing Secrets - Mastering Shadows and Highlights
Hey there, photography enthusiasts!
Today, we're diving into the intricacies of night street photography and how to achieve that perfect balance between shadows and highlights using Lightroom. Capturing the essence of a city at night is an art form, and I'm here to share my tips and tricks to help you master it.
Let's get into it!

Before editing
Exposing for the Highlights
In night street photography, one of your biggest challenges is dealing with varied lighting conditions. In the photo we're discussing, I focused on exposing for the Highlights – this includes street lights, shop lights, and the sky. A great way to achieve this is by using the Highlight-Weighted Metering Mode, a personal favorite of mine which literally allows you to meter for any lights in the scene thus ensuring they are not blown out. The only downside to this is that the rest of your photo may well be under exposed, but you can certainly recover those shadows in post.
Alternative Approach: Bracketing Your Shots
Another effective strategy is bracketing your shots. This involves taking underexposed, correctly exposed, and overexposed images and then blending them together in Photoshop or Lightroom. This technique ensures that all elements of your image are blended into a properly exposed image. I would imagine that every camera has a bracketing setting for you to take advantage of. Check out your camera’s manual or look at a YouTube video if you prefer.
Analyzing the Histogram
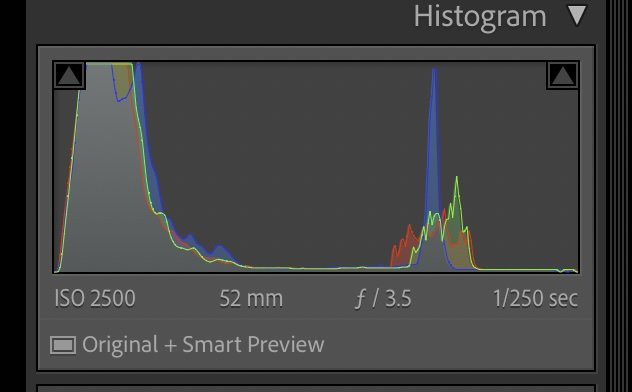
As you can see for this image, which I exposed with highlight weighted metering mode, upon examining the Histogram, we can see that the image is mostly underexposed, except for the correctly exposed Highlights. All that is required now, is to recover the shadows and integrate them with the highlights and the midtones in Adobe Lightroom.
Editing Process in Lightroom
Reducing Contrast: We begin by slightly reducing the overall Contrast of the image. This helps in preparing the image for further adjustments.
Adjusting Shadows: Next, we increase the Shadows. It's crucial not to overdo this step, as we still want to maintain the essence of a night scene.
Toning Down Highlights: Then, we reduce the Highlights. I personally prefer to also decrease the clarity a bit to create softer vibes and add atmospheric haze by adjusting the DEH slider.
Temperature and Tint Adjustments: Cooling down the photo by tweaking the Temperature and Tint adds another layer of depth to the image.
Applying a Radial Filter: To bring focus to the main subjects, a Radial Filter is applied, slightly increasing their Exposure.
Selective Exposure Adjustments: I also recommend reducing the Exposure in the sky, now made effortless with the 'Select Sky' feature in Lightroom.
Enhancing Saturation: A subtle increase in Saturation can be added to the sky for that extra pop of color.
Sharpness and Noise Reduction: Since a significant part of this image was underexposed, adding some sharpening and noise reduction is essential. We use the masking feature to selectively sharpen the subject and foreground.
Final Touches with Cropping: The last step is to crop the image for the desired composition.

Key Takeaways and Tips
Protect Your Highlights: It's vital to protect Highlights as they can't be recovered if blown out. However, Shadow details are mostly recoverable, unless you crush the blacks which are not recoverable.
Histogram Monitoring: Always keep an eye on your Histogram. Avoid letting the peaks touch the extreme edges to prevent clipping Highlights or crushing blacks.
Shadow Play: When shooting at night, underexpose your subjects and later increase the Shadows in post-production. This ensures your Highlights don't get blown out.
Lightroom’s Unique Advantage: One of the biggest advantages of Lightroom is the ease with which you can make local adjustments, like selecting the sky with just one click. This feature not only saves time but also enhances precision in editing.

Clippedogram
Conclusion
Night street photography is a blend of technical skill and creative vision. By following these steps and tips, you can elevate your night photography and create images that are both captivating and technically sound.
If you have any questions, feel free to drop them in the comments below.
Now, go forth and create stunning night street photographs!